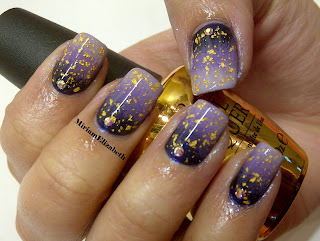
The products I will be using for this tutorial are the following:
- Orly Bonder Basecoat
- Technic Lilac
- OPI A Grape Fit!
- OPI Ink
- OPI Man With the Golden Gun
- Orly Polished Top Coat
- OPI Drip Dry
- Swarovski AB Crystals
- Orange Stick
- A small section of Sponge
- Acetone
- A thin angled Brush
Step 1: Paint your nails with a base coat. I used Orly's Bonder.
Step 2: Paint on two coats of a light coloured nail varnish. As I previously mentioned, I am using Technic's Lilac, a beautiful shade of purple.
Step 3: Cut up a small section of makeup or kitchen sponge. Make sure that there is one flat edge available. This is where you will be applying the nail varnish.
Step 4: Paint on even stripes of your three nail varnish colours.
Step 5: Dab the sponge onto your nail. Make sure you watch where you are placing the sponge so that you can achieve the desired effect. Let this layer dry and then repeat it.
Step 6: Use a cotton bud soaked in nail varnish remover to clean up the excess nail varnish from each fingernail. I also used a thin angled brush dipped in Acetone to remove varnish around the cuticle. This is a very precise method.
Step 7: Next, I applied two layers of OPI's Man With the Golden Gun, which is a real 18k Gold top coat.
NOTE: If you do not have this top coat, another idea is to use a glitter top coat.
Step 8: Apply a generous layer of top coat to the entire nail.
Step 9: While the top coat is still wet, add one crystal to the bottom of your nail to add some intricacy. I used Swarovski AB crystals as they are gorgeous and shine a different colour when you view them at different angles.
Step 10: Wait 60 seconds, and then apply three drops of OPI's Drip Dry to each nail. This product decreases the drying time massively, again adding a gel-like shine and hardness to each nail.
Step 3: Cut up a small section of makeup or kitchen sponge. Make sure that there is one flat edge available. This is where you will be applying the nail varnish.
Step 4: Paint on even stripes of your three nail varnish colours.
Step 6: Use a cotton bud soaked in nail varnish remover to clean up the excess nail varnish from each fingernail. I also used a thin angled brush dipped in Acetone to remove varnish around the cuticle. This is a very precise method.
Step 7: Next, I applied two layers of OPI's Man With the Golden Gun, which is a real 18k Gold top coat.
NOTE: If you do not have this top coat, another idea is to use a glitter top coat.
Step 8: Apply a generous layer of top coat to the entire nail.
Step 9: While the top coat is still wet, add one crystal to the bottom of your nail to add some intricacy. I used Swarovski AB crystals as they are gorgeous and shine a different colour when you view them at different angles.
Step 10: Wait 60 seconds, and then apply three drops of OPI's Drip Dry to each nail. This product decreases the drying time massively, again adding a gel-like shine and hardness to each nail.
Voila, one luxury gradient manicure to go.
Get painting!
x


No comments:
Post a Comment