Monday 31 December 2012

New Year's Eve Nails

This is a short post just to say Happy New Year to all you lovely people. It has been one hell of a year, including creating this blog and gaining over 1000 views. This makes me very happy :)

I also thought I would show you my nails for this evening - extra glam and extra sparkly!

The products I used for this look were the following:

Orly Bonder Base Coat
OPI Casino Royale
Milani Jewels FX Gold
Orly Polished Top Coat
OPI Drip Dry
Pieces of pink glitter
Reinforcement stickers

The procedure for this manicure is similar to the Half Moon Manicure however with the addition of pink glitter pieces.

Here is the finished product:


I hope you all have a great evening, here's to 2013!

x


Tuesday 11 December 2012

Swarovski Water Marble Manicure

It has been a couple of weeks since my last post and tutorial, as I was lucky enough to be enjoying the beauty of Austria with James. So, in order to make up for my short disappearance, I have chosen a rather challenging manicure to show you all.

I have named this one the Swarovski Water Marble Manicure. The 'Water Marbling' part is pretty self explanatory as I will be using water to create a marbled effect. The 'Swarovski' part refers to the beautiful crystals I will be adding to each nail. Whilst in Austria, we visited the stunning Swarovski Crystal World, where I purchased two packs of crystals; a beautiful deep indigo colour and a light grey opal colour.

WORDS OF WARNING: This is a challenge! Do not attempt it if you only have 15 minutes to spare. This manicure requires patience, practice and resilience.

Water marbling is a technique where one drops droplets of nail varnish into a container of water. This droplet spreads out to make a circle. One then proceeds to drop various other colours into the water, creating a bullseye. Using a toothpick, one then creates a pattern in the water, and when the nail is dipped into the container, the pattern transfers onto the fingernail.

Additionally, it is appropriate for me to mention that not all nail varnishes work for this technique, which can be very frustrating. I have found that it is best to use nail varnishes of the same brand, and preferably ones which are not too old.


The products I will be using for this tutorial are the following:

  • China Glaze's First and Last: I used this multi-tasking nail varnish as both my base and top coat
  • OPI's Don't Pretzel My Buttons
  • OPI's Ink
  • A toothpick
  • Cotton buds
  • A glass of bottled or filtered water at room temperature
  • Swarovski crystals: I used Opal and AB crystals
  • Scotch tape or Sellotape
  • An orange wood stick
  • Nail varnish remover

Ready?

Step 1: Paint your nails with a base coat. I tend to use China Glaze's First and Last as it dries very quickly.

Step 2: Paint on two coats of any coloured nail varnish. As I previously mentioned, I am using OPI's Ink, which is a beautiful blue/purple colour.


Step 3: Prepare all the equipment required, including: a toothpick, cotton buds, a glass of bottled or filtered water at room temperature, and some Scotch tape or Sellotape.


Step 4: Place Scotch tape or Sellotape around the outside of each nail. This will mean that the clean up process is a lot quicker and easier.


Step 5: Drop droplets of both colour nail varnishes into the water, one at a time, until you have roughly five or six rings.


Step 6: Using a toothpick, draw a design in the water. In order to create a flower petal style design, begin dragging the outside ring to the centre, and then complete this process as though the bullseye was a clock face - dragging the 12, 3, 6, and 9 to the centre, and then proceeding to drag the 1, 4, 7 and 10 to the centre.


Step 7: At an angle, push your finger into the water, so that the entire nail is submerged.


Step 8: Blow on the water's surface lightly, for about 10 seconds. This will ensure that the nail varnish on the surface dries.

Step 9: Using a cotton bud, wipe the surface of the water so that all the nail varnish is removed.

Step 10: Slowly lift your finger out of the water. You should be left with a unique design on your nail.


Step 11: Remove the tape, then use a cotton bud soaked in nail varnish remover to get rid of any excess nail varnish.

Step 12: Apply a small amount of top coat to the bottom of each nail, using a moist orange wood stick. Pick up one large crystal and place it in the centre, then pick up two smaller crystals and place them on either side.


NOTE: I would wait for a couple of hours before applying a top coat over the entire nail, as the design will smudge if it has not dried properly.

EXTRA: Pictured below are two different colour combinations and designs that you can recreate.


Voila, one beautiful Swarovski Water Marble manicure to go.

Get painting!

x


Thursday 29 November 2012

My First Nail Customer

This post is going to be a very short one, yet very significant in the long term.

Today, I had my first nail customer - my lovely cousin Isabelle, accompanied by the equally lovely Alice.

I created a nail design with a nude base - my latest purchase OPI's Don't Pretzel My Buttons - and a sparkling glitter gradient, with the beautiful additions of crystals and holographic decorations.

This design is very similar to the 'Diamond Winter Manicure', but with a different base colour.

I must admit that it was very strange creating nail art the opposite way round to the procedure I would carry out on my own nails, but nevertheless, practise makes perfect.


x

Wednesday 28 November 2012

Today's Nails (+ the start of requests)

I have chosen to do an extra post in addition to Monday's 'Read All About It' Newspaper Manicure, simply to show you another design I have done - a variation of the 'Diamond Winter Manicure'.

This design was created using the following:
  • China Glaze's First and Last
  • OPI's Every Month is Oktoberfest
  • Revlon's Sparkling
  • Swarovski AB Crystals
  • Circular Holographic Nail Decorations
  • A Sponge

Here is the final result:


Also, I have another idea to propose to you all.

On Saturday, I am going to Austria for a week (yay!), and if by the time I come back, I have had a further 50 views, for the first nail art request that gets sent to me, either via my Facebook account: Miriam Elizabeth Trusiana, or my email address: miriambotte@hotmail.co.uk, I will create a tutorial for that request on the 10th December.

Get sending!

x

Monday 26 November 2012

'Read All About It' Newspaper Manicure

This 'Read All About It' Newspaper Manicure adds an element of quirkiness to your nails, combining nail varnish, newspaper and a few Swarovski Crystals. In order to complete this manicure, you do not need to have a very steady hand or even a great deal of time.

NOTE: I used a jade green nail varnish as the base for the newspaper, but you can use any light colour you desire.

The products I will be using for this tutorial are the following:

  • China Glaze's First and Last: I used this multi-tasking nail varnish as both my base and top coat
  • Revlon's Sparkling: An incredible glitter nail varnish, with both small and large glitters
  • Revlon's Jaded: A pale green/jade coloured nail varnish
  • Swarovski AB crystals: I seriously recommend buying these, they are simply beautiful
  • Small sections of newspaper
  • Alcohol - not to drink! I used Vodka
Ready?

Step 1: Paint your nails with a base coat. I tend to use China Glaze First and Last as it dries very quickly.

Step 2: Paint on two coats of a light coloured nail varnish. As I previously mentioned, I am using Revlon's Jaded. Then, on both of your ring fingers, follow with two coats of a silver glitter nail varnish. I am using Revlon's Sparkling.


Step 3: Prepare your newspaper for usage by cutting out small sections - wide enough to cover your own nail, and a bit extra. I chose to use sections of newspaper with bold fonts however you may wish to choose a variety of fonts and sizes.

Step 4: Dip your fingernail into a small amount of Alcohol, from the end of your nail to the cuticle.

Step 5: Take your small section of newspaper, and press it down firmly onto your nail. Wait for 30 seconds or so, to ensure that the maximum amount of ink transfers onto your nail.


Step 6: Peel the newspaper cutting off your nail, revealing the newspaper print.

Step 7: Add one crystal onto the bottom of your nail to add some intricacy. I used Swarovski AB crystals as they are gorgeous and shine a different colour when you view them at different angles.

Step 8: Finish with a top coat and then once that has dried, use a cotton bud soaked in nail varnish remover to clean up the excess nail varnish and ink from each fingernail.


Voila, one beautiful newspaper manicure to go.

Get painting!

x


Monday 19 November 2012

Andromeda Galaxy Nails - with real Swarovski Crystal

Andromeda is an incredible spiral Galaxy, located roughly 2.5 million light years away from Earth. This nail manicure will portray the beauty of Andromeda, but on a slightly smaller scale.

The products I will be using for this tutorial are the following:

  • China Glaze's First and Last: I used this multi-tasking nail varnish as both my base and top coat
  • Revlon's Sparkling: An incredible glitter nail varnish, with both small and large glitters
  • Barry M's Black
  • Barry M's Lemon
  • China Glaze's Up All Night
  • Sally Hansen's Natural White
  • Collection 2000's Candy Floss

Ready?

Step 1: Paint your nails with a base coat. I tend to use China Glaze First and Last as it dries very quickly.

Step 2: Paint on two coats of a black nail varnish. As I previously mentioned, I am using Barry M's Black nail paint.


Step 3: Using a small section of a makeup sponge - or kitchen sponge - sponge on a small amount of white paint, either in a diagonal shaped line down your nail, or in a straight line horizontally across your nail. Try not to use too much paint. 


Step 4: Repeat the sponging action, but this time with a yellow nail varnish, building on the white paint that you have just sponged.


Step 5: Repeat the sponging action, but this time with a baby pink nail varnish, building on the yellow
paint that you have just sponged.


Step 6: Using the sponge, dab some dark blue nail varnish around the edges of the nebula you have created. This will help to blend the white, yellow and pink with the black base colour.


Step 7: Using a cocktail stick or dotting tool, create lots of small white 'stars' on either sides of your nebula, as shown below. Then load a larger quantity of white paint onto the cocktail stick, in order to create one or two larger stars.


Step 8: Now it's time to attach these beautiful Swarovski AB Crystals. Paint your topcoat onto each nail and using an orange wood stick, pick up one or two Swarovski Crystals individually, and place them over the larger stars that you created.


~ ADDITIONAL STEP FOR THOSE WHO WOULD LIKE EXTRA SPARKLE AND DETAIL ~

Step 9: Using a silver glitter nail varnish, paint a thin layer over the entirety of your nail. This will accentuate the beauty of the AB Crystals, as well as creating a beautiful shine over the nail.


Step 10: Finish with a top coat and then once that has dried, use a cotton bud soaked in nail varnish remover to clean up the excess nail varnish from each fingernail.

Voila, one beautiful Andromeda manicure to go.

Get painting!

x


Monday 12 November 2012

Diamond Winter Manicure

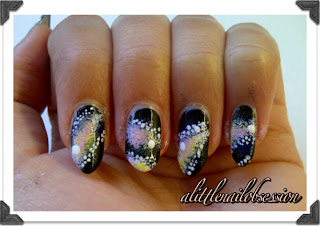
On this extremely gloomy day, I have decided to show you all a new manicure. In comparison to the simple yet elegant half moon design that was featured on this blog last week, this current design is full of glitter and glamour.

I have named this manicure the 'Diamond Winter Manicure' as I believe it is perfect for the Winter party season, as well as the fact that each nail is decorated with glitter particles and gorgeous rhinestones.

WORDS OF WARNING: The sponging technique in this manicure can be slightly messy around each nail. If you do not want to spend the time cleaning up each nail afterwards, then I suggest wrapping scotch tape or sellotape around the outside of each nail.

The products I will be using for this tutorial are the following:
  • China Glaze First and Last: I used this multi-tasking nail varnish as both my base and top coat
  • Revlon's Gray Suede Nail Enamel: A beautiful natural yet opaque nude nail varnish
  • Revlon's Sparkling: An incredible glitter nail varnish, with both small and large glitters
  • A Sponge: Used to create the gradient glitter effect
  • An Orange Wood Stick: Used to pick up the rhinestones
  • Rhinestones: I used clear rhinestones for this manicure
Ready?
Step 1: Paint your nails with a base coat. I tend to use China Glaze First and Last as it dries very quickly.

Step 2: Paint on two coats of a nude coloured nail varnish. As I previously mentioned, I am using Revlon's Gray Suede as it is a beautifully natural colour. 


Step 3: Find either a makeup sponge - or even just a kitchen sponge - and cut a small section which is a bit wider than the width of your nail. Using 'Sparkling' or a different glitter nail varnish, apply a small amount onto the sponge as shown below.


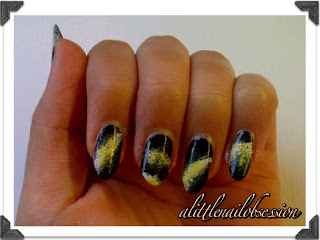
Step 4: Proceed to dab the sponge onto the nail, concentrating at the top of your nail and then using less nail varnish the further down your nail you travel. Only cover roughly two thirds of your nail in the glitter nail varnish. You should be left with a design similar to the images featured below:


Step 5: Repeat step four twice, only concentrating on the end of your nail. Be aware: You must let each layer of glitter dry before proceeding with the next coat. Using a hair dryer will speed up this process if desired.

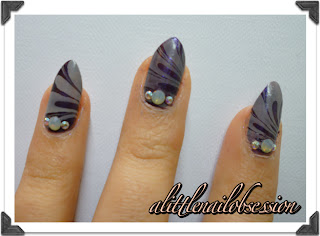
Step 6: Using an orange wood stick or tweezers, pick up three rhinestones individually and place them randomly at the top of each nail where the glitter nail varnish is concentrated. This step adds intricacy and extra sparkle to each nail.


Step 7: Finish with a top coat and then once that has dried, use a cotton bud soaked in nail varnish remover to clean up the excess glitter from each fingernail.


Voila, one glamorous manicure to go.
 
Get painting!
 
x