Thursday 30 May 2013

'Nails by Miriam Elizabeth'

So, a new chapter of my life has begun! Within the next two weeks, I will be launching 'Nails by Miriam Elizabeth', a nail art service for those who wish their nails to be glamorous, fabulous and most importantly to stand out from the crowd.

If you live in Maidenhead, or in the surrounding areas, and wish to have your nails done by myself, please do not hesitate to get in touch either:

Via Email: nailsbymiriamelizabeth@outlook.com

OR

Via Mobile: 07979 855 883

OR

Via Facebook: https://www.facebook.com/pages/Nails-by-Miriam-Elizabeth/449702485122543?id=449702485122543&sk=info

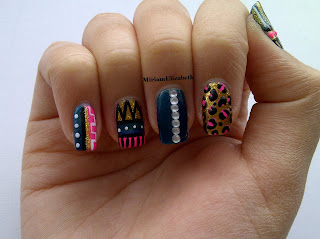
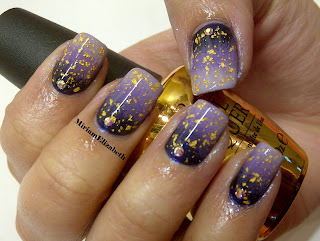
Below are some pictures of a selection of designs I will be offering:


Until next time!

Miriam 

x

Monday 25 March 2013

Easter Chocolate Themed Nails

This week, I have decided to show you all my Easter themed manicure. It is similar to the Summer Swirl Manicure from last week but with different colours and Swarovski placement.

The products I used for this manicure are the following:
  • Orly Bonder Basecoat
  • The Edge's White
  • Collection 2000's Candy Floss
  • 17's Tiger's Eye
  • Barry M's Black
  • Essie's Mademoiselle
  • The Edge's Top Coat
  • Swarovski AB Crystals (Medium)
  • Tweezers
  • Nail Glue
  • Nail Varnish Remover
  • Cotton Bud
  • Fine Paint Brush 

I used a marbling technique whereby I put droplets of colour on a wet base of Essie's Mademoiselle and then used a fine paint brush to swirl the colours together.

This is the final design:


Until next time :)

x

Monday 18 March 2013

Summer Swarovski Swirl Manicure

Today I bring you all the Summer Swarovski Swirl Manicure...Bit of a mouthful I know.

This involves a very fun technique named Marbling. I have previously done a tutorial featuring Marbling with water, but this manicure contains Marbling minus water, which is a lot less messy :) Yay.


The products I will be using for this tutorial are the following:
  • Orly Bonder Basecoat
  • Revlon's Jaded
  • Revlon's Cherries In The Snow
  • Orly Polished Top Coat
  • Barry M's Black
  • Essie's Mademoiselle
  • Swarovski AB Crystals (Large, Medium and Small)
  • Tweezers
  • Nail Glue
  • Nail Varnish Remover
  • Cotton Bud

Ready?

Step 1: Paint your nails with a base coat. I used Orly's Bonder.

Step 2: Paint on two coats of a sheer nude nail varnish. As I previously mentioned, I am using Essie's Mademoiselle.

Step 3: Paint on a very thick third coat of Mademoiselle. Then drop three or four drops of nail varnish at the top of your nail. For this step, I dropped mint green, pink and black coloured nail varnishes.


Step 4: With a small paint brush, proceed to swirl the nail varnish, mixing the colours from side to side. This is meant to be a random design, so there is no right or wrong. Wait for this to dry thoroughly.

Step 5: Draw a line of nail glue horizontally under where your swirl has finished.

Step 6: Proceed with using tweezers to place one large Swarovski AB Crystal in the centre and one medium sized crystal on either side.

Step 7: For your thumb nail, add one even smaller crystal on either side of the medium sized crystal.

Step 8:  Apply a generous layer of top coat. I used Orly's Polished which gives a brilliant shine to the nail.

Step 9: Wait 60 seconds, and then apply three drops of Leighton Denny's Miracle Drops to each nail. This product decreases the drying time massively, again adding a gel-like shine and hardness to each nail.

Step 10: Use a cotton bud soaked in nail varnish remover to clean up the excess nail varnish from each fingernail.


Voila, one psychedelic swirl manicure to go.

Get painting!

x


Friday 25 January 2013

Today's Nails: Wild Tiger

The manicure I created today is inspired by wild life and specifically, the beautiful Tiger! It consists of a white and orange ombre manicure, covered by a layer of real gold flakes and then finished off with black Tiger stripes and a yellow rhinestone.

The pictures featured in this post are not a complete tutorial, however they will give you a rough idea as to how it was completed.

The products I used for this design are the following:

  • Orly Bonder Basecoat
  • The Edge Ivory Coast
  • Barry M Black
  • Missguided Splash Orange
  • OPI Goldeneye
  • The Edge Top Coat
  • OPI Drip Dry
  • Yellow Rhinestones
  • Orange Stick
  • Acetone
  • A thin angled Brush
  • Black Striper


Until next time :)

x

Saturday 19 January 2013

Today's Nails - Tribal Mix

The design I have chosen to show you today is my Tribal Mix nail art.

This design takes a steady hand and some patience, but the beauty of the design is that you can create your own completely random art, using lines, circles and triangles.

The products I used for this design are the following:

  • Orly Bonder Basecoat
  • China Glaze Pink Voltage
  • OPI Yodel Me On My Cell 
  • OPI Goldeneye
  • Orly Polished Top Coat
  • OPI Drip Dry
  • Clear Rhinestones
  • Orange Stick
  • Acetone
  • A thin angled Brush

The final product is shown below:

I really enjoyed creating this nail art as it is very bold, bright and in your face!


Until next time :)

x

Monday 14 January 2013

Luxury Gradient + Real Gold Manicure

This gradient manicure is a versatile design as it can be created with any colours and special effect top coat. It involves a sponging action, creating a dark to light pattern, also known as a gradient.


The products I will be using for this tutorial are the following:

  • Orly Bonder Basecoat
  • Technic Lilac
  • OPI A Grape Fit!
  • OPI Ink
  • OPI Man With the Golden Gun
  • Orly Polished Top Coat
  • OPI Drip Dry
  • Swarovski AB Crystals
  • Orange Stick
  • A small section of Sponge
  • Acetone
  • A thin angled Brush

Ready?


Step 1: Paint your nails with a base coat. I used Orly's Bonder.

Step 2: Paint on two coats of a light coloured nail varnish. As I previously mentioned, I am using Technic's Lilac, a beautiful shade of purple.


Step 3: Cut up a small section of makeup or kitchen sponge. Make sure that there is one flat edge available. This is where you will be applying the nail varnish.

Step 4: Paint on even stripes of your three nail varnish colours.


Step 5: Dab the sponge onto your nail. Make sure you watch where you are placing the sponge so that you can achieve the desired effect. Let this layer dry and then repeat it.


Step 6: Use a cotton bud soaked in nail varnish remover to clean up the excess nail varnish from each fingernail. I also used a thin angled brush dipped in Acetone to remove varnish around the cuticle. This is a very precise method.

Step 7: Next, I applied two layers of OPI's Man With the Golden Gun, which is a real 18k Gold top coat.

NOTE: If you do not have this top coat, another idea is to use a glitter top coat.


Step 8: Apply a generous layer of top coat to the entire nail.

Step 9: While the top coat is still wet, add one crystal to the bottom of your nail to add some intricacy. I used Swarovski AB crystals as they are gorgeous and shine a different colour when you view them at different angles.


Step 10: Wait 60 seconds, and then apply three drops of OPI's Drip Dry to each nail. This product decreases the drying time massively, again adding a gel-like shine and hardness to each nail.


Voila, one luxury gradient manicure to go.

Get painting!

x


Wednesday 9 January 2013

The Classic French Manicure

Today I have chosen to stray from my usual style of nail art and show the classic and elegant French Manicure. This design is timeless and one of the most requested worldwide!

There are many ways of doing a French Manicure, including using stickers, or even doing it free hand. The way I carry out this manicure is by using a brush and acetone to create the tip shape you desire.

This design does take practice and a steady hand, but once you have mastered the application, you will more than reap the rewards.

The products I will be using for this tutorial are the following:

  • The Edge Ivory Coast
  • Essie Mademoiselle
  • Orly Polished Top Coat
  • OPI Drip Dry
  • Bamboo Angled Brush
  • Pure Acetone

Ready?


Step 1: Using a white nail varnish, paint vertical stripes over the tips of your nail, creating a messy French Manicure tip. Allow this to dry and then repeat.


Step 2: Once the white tip is dry, dip a thin angled brush into a small amount of pure acetone. Using the acetone on the brush, use a sweeping motion to neaten up the edge of the white tip. Play about with the position of the brush to decide which is easiest for you. After you remove a small amount of white nail varnish, dab the brush on a piece of tissue to remove the excess. Repeat this on all ten fingers until you are happy with the curve you have created.


Step 3: Paint two coats of sheer light pink nail varnish over the entire nail. I used Essie's Mademoiselle as it is a very sheer nail varnish and does not dull the brightness of the white.

 - I have not included a picture of this step as it looks extremely similar to the final product image - 

Step 4: Once the pink nail varnish has dried, apply a generous layer of top coat. I used Orly's Polished which gives a brilliant shine to the nail.

Step 5: Wait 60 seconds, and then apply three drops of OPI's Drip Dry to each nail. This product decreases the drying time massively, again adding a gel-like shine and hardness to each nail.

Step 6: Use a cotton bud soaked in nail varnish remover to clean up the excess nail varnish from each fingernail.


Voila, one sophisticated French Manicure to go.

I hope this has been helpful.

Get painting!

x