Saturday, 19 January 2013

Today's Nails - Tribal Mix

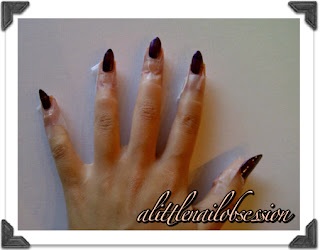
The design I have chosen to show you today is my Tribal Mix nail art.

This design takes a steady hand and some patience, but the beauty of the design is that you can create your own completely random art, using lines, circles and triangles.

The products I used for this design are the following:

  • Orly Bonder Basecoat
  • China Glaze Pink Voltage
  • OPI Yodel Me On My Cell 
  • OPI Goldeneye
  • Orly Polished Top Coat
  • OPI Drip Dry
  • Clear Rhinestones
  • Orange Stick
  • Acetone
  • A thin angled Brush

The final product is shown below:

I really enjoyed creating this nail art as it is very bold, bright and in your face!


Until next time :)

x

Monday, 14 January 2013

Luxury Gradient + Real Gold Manicure

This gradient manicure is a versatile design as it can be created with any colours and special effect top coat. It involves a sponging action, creating a dark to light pattern, also known as a gradient.


The products I will be using for this tutorial are the following:

  • Orly Bonder Basecoat
  • Technic Lilac
  • OPI A Grape Fit!
  • OPI Ink
  • OPI Man With the Golden Gun
  • Orly Polished Top Coat
  • OPI Drip Dry
  • Swarovski AB Crystals
  • Orange Stick
  • A small section of Sponge
  • Acetone
  • A thin angled Brush

Ready?


Step 1: Paint your nails with a base coat. I used Orly's Bonder.

Step 2: Paint on two coats of a light coloured nail varnish. As I previously mentioned, I am using Technic's Lilac, a beautiful shade of purple.


Step 3: Cut up a small section of makeup or kitchen sponge. Make sure that there is one flat edge available. This is where you will be applying the nail varnish.

Step 4: Paint on even stripes of your three nail varnish colours.


Step 5: Dab the sponge onto your nail. Make sure you watch where you are placing the sponge so that you can achieve the desired effect. Let this layer dry and then repeat it.


Step 6: Use a cotton bud soaked in nail varnish remover to clean up the excess nail varnish from each fingernail. I also used a thin angled brush dipped in Acetone to remove varnish around the cuticle. This is a very precise method.

Step 7: Next, I applied two layers of OPI's Man With the Golden Gun, which is a real 18k Gold top coat.

NOTE: If you do not have this top coat, another idea is to use a glitter top coat.


Step 8: Apply a generous layer of top coat to the entire nail.

Step 9: While the top coat is still wet, add one crystal to the bottom of your nail to add some intricacy. I used Swarovski AB crystals as they are gorgeous and shine a different colour when you view them at different angles.


Step 10: Wait 60 seconds, and then apply three drops of OPI's Drip Dry to each nail. This product decreases the drying time massively, again adding a gel-like shine and hardness to each nail.


Voila, one luxury gradient manicure to go.

Get painting!

x


Wednesday, 9 January 2013

The Classic French Manicure

Today I have chosen to stray from my usual style of nail art and show the classic and elegant French Manicure. This design is timeless and one of the most requested worldwide!

There are many ways of doing a French Manicure, including using stickers, or even doing it free hand. The way I carry out this manicure is by using a brush and acetone to create the tip shape you desire.

This design does take practice and a steady hand, but once you have mastered the application, you will more than reap the rewards.

The products I will be using for this tutorial are the following:

  • The Edge Ivory Coast
  • Essie Mademoiselle
  • Orly Polished Top Coat
  • OPI Drip Dry
  • Bamboo Angled Brush
  • Pure Acetone

Ready?


Step 1: Using a white nail varnish, paint vertical stripes over the tips of your nail, creating a messy French Manicure tip. Allow this to dry and then repeat.


Step 2: Once the white tip is dry, dip a thin angled brush into a small amount of pure acetone. Using the acetone on the brush, use a sweeping motion to neaten up the edge of the white tip. Play about with the position of the brush to decide which is easiest for you. After you remove a small amount of white nail varnish, dab the brush on a piece of tissue to remove the excess. Repeat this on all ten fingers until you are happy with the curve you have created.


Step 3: Paint two coats of sheer light pink nail varnish over the entire nail. I used Essie's Mademoiselle as it is a very sheer nail varnish and does not dull the brightness of the white.

 - I have not included a picture of this step as it looks extremely similar to the final product image - 

Step 4: Once the pink nail varnish has dried, apply a generous layer of top coat. I used Orly's Polished which gives a brilliant shine to the nail.

Step 5: Wait 60 seconds, and then apply three drops of OPI's Drip Dry to each nail. This product decreases the drying time massively, again adding a gel-like shine and hardness to each nail.

Step 6: Use a cotton bud soaked in nail varnish remover to clean up the excess nail varnish from each fingernail.


Voila, one sophisticated French Manicure to go.

I hope this has been helpful.

Get painting!

x


Saturday, 5 January 2013

Today's Nails - Holographic Magic

The nail design I have chosen to show you today combines holographic nail varnish, leopard print, rhinestones, pearls and fimo canes.

Due to the detail, the accent fingers are fairly labour intensive, but worth it in my eyes!


The products I used for this look were the following:

Orly Bonder Base Coat
Layla Mercury Twilight Hologram Effect Nail Polish
China Glaze Pink Voltage
Black Nail Art Pen
Orly Polished Top Coat
OPI Drip Dry
Rhinestones (Large and Small)
Pearl Hearts
Three Fimo Canes -Heart, Bear and Flower


Thumb: In order to create the look featured on my thumb, I began with three coats of holographic nail varnish. I then used nail glue to apply three thin slices of Fimo canes at the bottom of my nail against the Cuticle. I then used a bobby pin to draw various pink ovals. Using a nail art pen, I then drew 'C' shapes around each oval to create the leopard print outline. I finished with three drops of OPI Drip Dry.

Middle Finger: In order to create the look featured on my middle finger, I began with two coats of holographic nail varnish. I then used my top coat to stick each rhinestone on. I used smaller rhinestones to outline the edge of my nail and larger rhinestones in the middle of the nail. I also positioned two pearl hearts to add some intricacy and detail. Again, I finished with three drops of OPI Drip Dry.

Here is the finished product:


I hope you all like this design :)

Until next time!

x

Two Weeks Worth of Nails

So, it has been a couple of weeks since the last blog post, and that is why I am going to be showing you a few different nail looks.

The first nail look that I completed was a mix and match set consisting of:
  • V tipped nail with leopard print
  • Sandy gold nail with a single gold stud
  • Crocodile print nail
  • Glitter fade nail
  • Swarovski crystal packed nail
This is the final product:


The second nail design I completed was a glitter fade set with a red and white Christmas theme. I used Models Own 'Snowflakes' - a white and gold glitter flake nail varnish - on the tips of my nails to look like ice. This is a quick and easy nail look to do, similar to the Diamond Winter Manicure.

This is the final product: It reminds me also of Lindt chocolate wrappers


During December, I have bought a few new glitter nail varnishes and decided to swatch them on a practice wheel for you to see. 

From left to right: Models Own Snowflakes, Models Own Dancing Queen, Models Own Ibiza Mix, Orly Rockets Red Glare, Orly Be Brave, Orly Sunglasses at Night. Full reviews will be covered on this blog shortly.


The final look I created is probably my favourite. This look consists of Barry M's Black, and Orly's Rockets Red Glare.

This is the final product:


I hope these designs have given you some inspiration :)

Until next time!

x


Monday, 31 December 2012

New Year's Eve Nails

This is a short post just to say Happy New Year to all you lovely people. It has been one hell of a year, including creating this blog and gaining over 1000 views. This makes me very happy :)

I also thought I would show you my nails for this evening - extra glam and extra sparkly!

The products I used for this look were the following:

Orly Bonder Base Coat
OPI Casino Royale
Milani Jewels FX Gold
Orly Polished Top Coat
OPI Drip Dry
Pieces of pink glitter
Reinforcement stickers

The procedure for this manicure is similar to the Half Moon Manicure however with the addition of pink glitter pieces.

Here is the finished product:


I hope you all have a great evening, here's to 2013!

x


Tuesday, 11 December 2012

Swarovski Water Marble Manicure

It has been a couple of weeks since my last post and tutorial, as I was lucky enough to be enjoying the beauty of Austria with James. So, in order to make up for my short disappearance, I have chosen a rather challenging manicure to show you all.

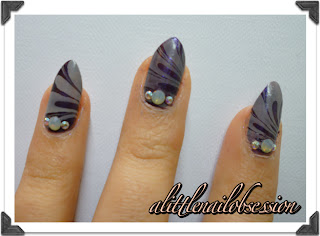
I have named this one the Swarovski Water Marble Manicure. The 'Water Marbling' part is pretty self explanatory as I will be using water to create a marbled effect. The 'Swarovski' part refers to the beautiful crystals I will be adding to each nail. Whilst in Austria, we visited the stunning Swarovski Crystal World, where I purchased two packs of crystals; a beautiful deep indigo colour and a light grey opal colour.

WORDS OF WARNING: This is a challenge! Do not attempt it if you only have 15 minutes to spare. This manicure requires patience, practice and resilience.

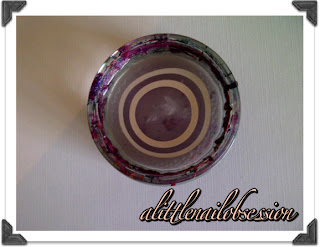
Water marbling is a technique where one drops droplets of nail varnish into a container of water. This droplet spreads out to make a circle. One then proceeds to drop various other colours into the water, creating a bullseye. Using a toothpick, one then creates a pattern in the water, and when the nail is dipped into the container, the pattern transfers onto the fingernail.

Additionally, it is appropriate for me to mention that not all nail varnishes work for this technique, which can be very frustrating. I have found that it is best to use nail varnishes of the same brand, and preferably ones which are not too old.


The products I will be using for this tutorial are the following:

  • China Glaze's First and Last: I used this multi-tasking nail varnish as both my base and top coat
  • OPI's Don't Pretzel My Buttons
  • OPI's Ink
  • A toothpick
  • Cotton buds
  • A glass of bottled or filtered water at room temperature
  • Swarovski crystals: I used Opal and AB crystals
  • Scotch tape or Sellotape
  • An orange wood stick
  • Nail varnish remover

Ready?

Step 1: Paint your nails with a base coat. I tend to use China Glaze's First and Last as it dries very quickly.

Step 2: Paint on two coats of any coloured nail varnish. As I previously mentioned, I am using OPI's Ink, which is a beautiful blue/purple colour.


Step 3: Prepare all the equipment required, including: a toothpick, cotton buds, a glass of bottled or filtered water at room temperature, and some Scotch tape or Sellotape.


Step 4: Place Scotch tape or Sellotape around the outside of each nail. This will mean that the clean up process is a lot quicker and easier.


Step 5: Drop droplets of both colour nail varnishes into the water, one at a time, until you have roughly five or six rings.


Step 6: Using a toothpick, draw a design in the water. In order to create a flower petal style design, begin dragging the outside ring to the centre, and then complete this process as though the bullseye was a clock face - dragging the 12, 3, 6, and 9 to the centre, and then proceeding to drag the 1, 4, 7 and 10 to the centre.


Step 7: At an angle, push your finger into the water, so that the entire nail is submerged.


Step 8: Blow on the water's surface lightly, for about 10 seconds. This will ensure that the nail varnish on the surface dries.

Step 9: Using a cotton bud, wipe the surface of the water so that all the nail varnish is removed.

Step 10: Slowly lift your finger out of the water. You should be left with a unique design on your nail.


Step 11: Remove the tape, then use a cotton bud soaked in nail varnish remover to get rid of any excess nail varnish.

Step 12: Apply a small amount of top coat to the bottom of each nail, using a moist orange wood stick. Pick up one large crystal and place it in the centre, then pick up two smaller crystals and place them on either side.


NOTE: I would wait for a couple of hours before applying a top coat over the entire nail, as the design will smudge if it has not dried properly.

EXTRA: Pictured below are two different colour combinations and designs that you can recreate.


Voila, one beautiful Swarovski Water Marble manicure to go.

Get painting!

x